These Authentic Mexican Conchas in Under 4 Hours feature a light egg dough similar to brioche, with a hint of orange blossom water and cinnamon. Also known as Pan Dulce, or sweet bread, this traditional Mexican breakfast roll is a delightful start to any day.
Don’t let the 4 hour time frame dissuade you from making this authentic Mexican Conchas recipe. The majority of the time in this recipe is dedicated to the two proving cycles and letting the finished rolls cool before serving. However, there’s also an easy way you can plan ahead and break up the recipe in stages – a helpful trick if you’re planning to make these lovely rolls for a brunch. Read on to learn how.
Gather your ingredients and let’s get started on making this old favorite of mine – Mexican Conchas!
Jump to RecipeMake way breakfast pastries for these Authentic Mexican Conchas in Under 4 Hours

I haven’t met a breakfast pastry I didn’t like. Danish, croissant, doughnuts, muffins, sticky buns, quick breads – heck, I even love a simple slice of toast with jam. There’s something about a sweet roll in the morning and a hot cup of coffee or tea that just works.
For me, I have to add Pan Dulce or more specifically, Mexican Conchas to my list of favorites. In fact, they land squarely at the top. This is partially due to childhood memories of my father bringing these delicious treats home after an occasional trip to Mexican Town in Detroit. I also have fond memories of time spent in Mexico on a family vacation where a basket of these freshly-baked rolls magically appeared every morning with a carafe of coffee, juice and fresh fruit by way of a small, 2-way cupboard in the wall of the villa where we stayed. I found this absolutely remarkable as a child.
Pan Dulce – Now which sweet bread is that exactly?

I find languages absolutely fascinating. They can be vague and specific, simple and complex at the same time. There are phrases that carry so much added weight in their native tongue – social and historical context – that fall flat when translated into another. To take it a step further, the meaning of words can vary from one Spanish-speaking country to the next. I talk about this to some degree in my recipe post for Easy Classic Mexican Polvorones in 2 Hours. What constitutes a Polvorón in one country is something completely different in another.
When it comes to Mexican sweet rolls, “pan dulce” is another such word. It’s not specific. Pan Dulce can represent a host of different sweetened breads, including these Conchas. And yet, anyone who grew up with these delectable treats knows exactly what you mean when you talk about them. I love the nuances of language!
The word “Concha” translates to “shell” in English and refers to the design on the top of these rolls. Conchas are a type of Pan Dulce.
Tips for success when making these delightful rolls

Some recipes require more of a time committment than others. These Authentic Mexican Conchas in Under 4 Hours is a weekend recipe if you’re planning to make them from start to finish.
When all is said and done, there is only about 45 minutes of active time between gathering ingredients, mixing the dough, dividing and rolling the dough and finishing the rolls before baking. The rest of that time is dedicated to proving the dough and allowing the finished rolls to cool before serving. And although it may seem like a lot of work, this is one of those recipes where you can start a proving stage and go about doing other things while the dough does its thing. I like those kind of recipes.
If you want to serve these rolls at a brunch but don’t have four hours to dedicate in the morning, there’s a way to save yourself come time the day of your event. The concha dough can be prepared the day before, taken through the first rise, rolled into balls and stored in the refrigerator overnight covered in plastic wrap. The colorful crust can also be divided into balls and rolled out into circles, with a piece of parchment paper between each circle to prevent sticking.
The morning of your event, pull the rolls out of the refrigerator and allow them to prove for approximately 1 hour until they double in size. If you have a proving drawer on your oven this may take as little as 45 minutes. Brush the tops of the roll with egg wash, apply the colored dough disk and score your concha shapes before baking for 20 minutes in a 350 degree F. oven. Allow the rolls to cool on the pan for roughly 10-15 minutes and you are ready to serve!
Another option is to bake these rolls the night before and store them in an airtight container. Because this dough is enriched with whole milk, egg and butter, it holds its moisture and texture better than a leaner dough.
A word on timing and sizing these rolls if you choose to chill the dough overnight
Traditionally, these rolls are often prepared large enough to serve two people – not mention induce a respectable carb coma. This recipe yields 16 rolls. I chose to size them smaller so that they fall more in line with a true single serving. However, if you wish to double the size of these rolls, divide both the Concha dough and topping into eight larger pieces instead of 16 and allow an additional 5-10 minutes when baking.

If you choose to either chill the dough overnight or double the size of these rolls before baking, you’ll need to adjust the proving time as well. Depending on how cold the dough is, additional proving time may be needed. If you are using a proving drawer on your oven, the additional time may be minimal, but if you are proving the rolls on your counter, depending on the ambient temperature of the room, this could take longer than the average one hour.
While developing this recipe, I used the proving drawer on my oven. I found that the additional time it took to prove the dough after chilling overnight still fell within 90 minutes to 2 hours total – including bake time and cooling time.
I hope you give this recipe for Authentic Mexican Conchas in Under 4 Hours a try. It’s a recipe that requires a little more time in the kitchen. However, considering the kitchen is the soul room of any house, and the speed at which we go through life, perhaps you’ll agree with me that slowing down and spending a little extra time in the kitchen can be time well spent.

Authentic Mexican Conchas in Under 4 Hours
Course: SidesCuisine: MexicanDifficulty: Intermediate16
servings45
minutes20
minutes2
hoursThese Authentic Mexican Conchas in Under 4 Hours feature a light egg dough similar to brioche, with a hint of orange blossom water and cinnamon.
Ingredients
- For the dough
1/3 cup whole milk
3 Tbsp. granulated sugar
3 eggs whisked, and at room temperature
2 tsp. orange blossom water
2 tsp. instant, rapid-rise yeast
1 1/2 cups bread flour
1 cup A.P. flour
1 tsp. salt
1 stick (4 ounces) unsalted butter, room temperature
- For the topping
1/2 cup white granulated sugar
1 stick (4 ounces) unsalted butter, room temperature
1 tsp. orange blossom water
1 cup A.P. flour
1/2 tsp. ground cinnamon
A few drops of food coloring ( your choice of colors, optional)
- For Finishing the Conchas
1 egg, beaten
Directions
- Prepare the dough
- In a small saucepan or in a microwave safe container, heat the milk to just under 110 degrees F. If the milk gets hotter, allow it cool so as not to risk killing the yeast.
- In a large mixing bowl, combine the milk, eggs, sugar, orange blossom water and yeast. Whisk together and allow to rest until the mixture begins to foam – approximately 5 minutes.
- In a separate bowl, combine the flours and salt. Pour into the wet mixture. Using a dough hook attachment, combine the wet and dry ingredients on medium-low speed until a sticky dough is formed – approximately 5 minutes.
- Scrape down the sides of the bowl. On medium-low heat, incorporate the butter one Tbsp. at a time until all the butter is incorporated into the dough. Scrape down the sides and bottom of the mixing bowl again and allow to mix on low speed for an additional 7-10 minutes. The dough will still be sticky at this stage.
- Transfer the dough to an oiled bowl. Cover the top with either plastic wrap or a towel and allow the dough to double in size. If using a proving drawer this step will take approximately 45 minutes – 1 hour.
- Prepare the topping
- While the dough is proving, in a small mixing bowl beat together the sugar, butter and orange blossom water until light and fluffy.
- Add the flour and cinnamon and incorporate on low until a soft dough forms.
- If using food coloring, divide the dough into groups and color according to your preference.
- Divide the topping into 16 equal pieces. Place a portion of the topping between two pieces of parchment paper and roll into a small disk that measures 2 1/2 inches across. Layer the disks between parchment paper to prevent sticking. Cover and store in the refrigerator until ready to assemble the rolls.
- Preparing the rolls for the 2nd proving cycle
- After the 1st proving cycle, divide the dough into 16 equal portions. The dough will be much easier to manage at this stage. Sprinkle a small amount of flour on your work surface. Place a ball of dough on the counter. Gently cup your hand over the dough and move your hand in a circular motion to create a ball. Place the formed ball of dough on a baking sheet, allowing 2 inches between each ball on all sides. Continue to form the other balls of dough.
- Cover the rolls with either a towel or plastic wrap and allow to prove until roughly doubled in size – approximately 1 hour.
- Finishing and baking the rolls
- About 10 minutes before the rolls have finished proving, remove the colored disks from the refrigerator and allow them to soften and come to room temperature.
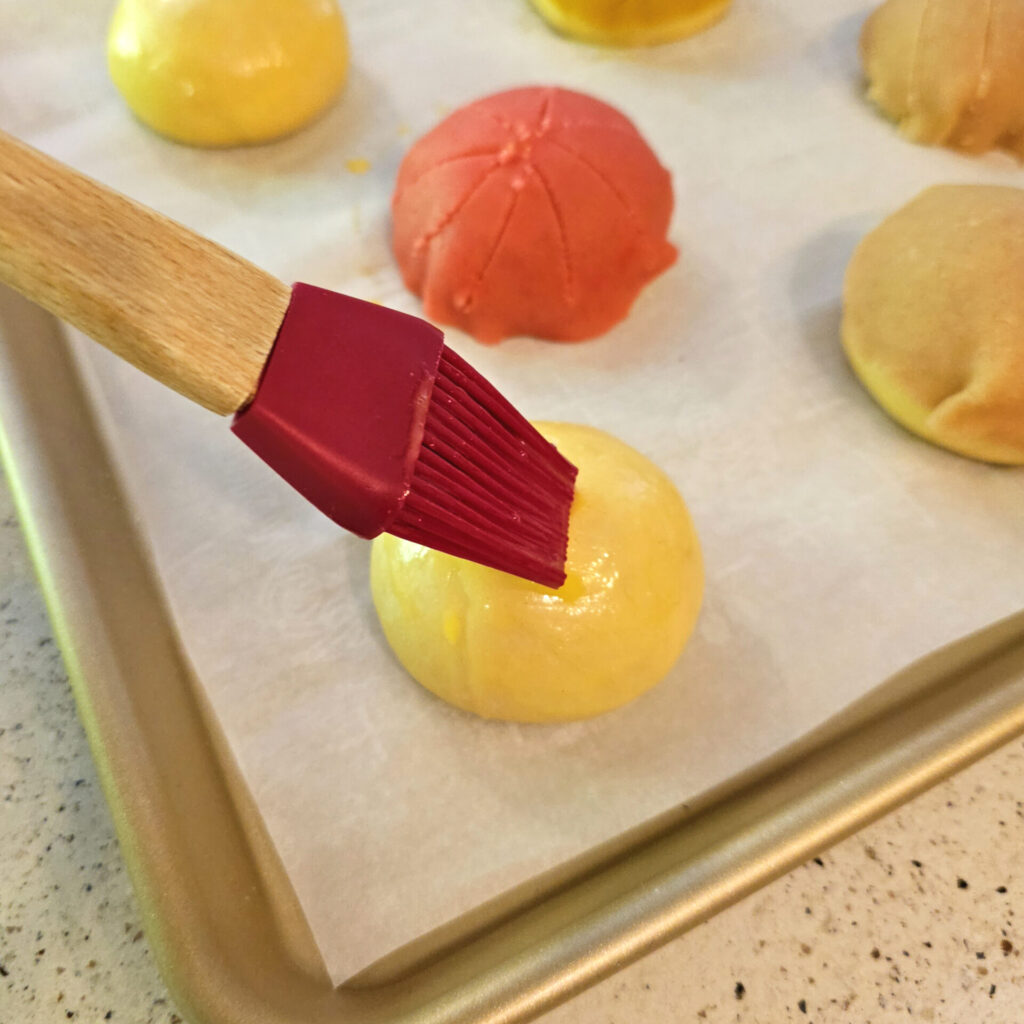
- When the rolls have completed their second proving cycle, they are ready to finish. Gently brush the tops of the rolls with the egg wash.
- Gently apply a disk of the topping to each roll. Using a sharp paring knife, gently score the top of the disk. Do not go all the way through to the roll. You only need to score the colored disk.
- Bake the rolls at 350 degrees F. for 20 minutes. The rolls will double in size again.
- Transfer the finished rolls to a cooling rack and allow them to cool for 10 minutes before serving.
- Rolls can be stored in an airtight container at room temperature for up to 5 days.