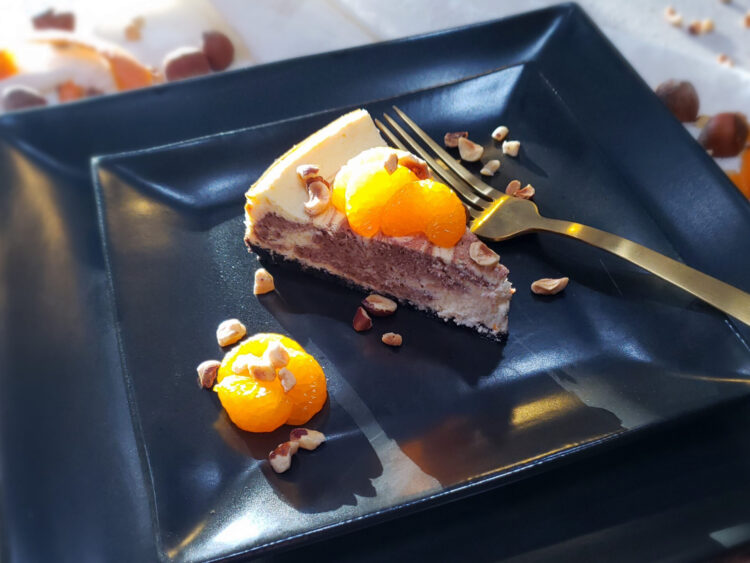
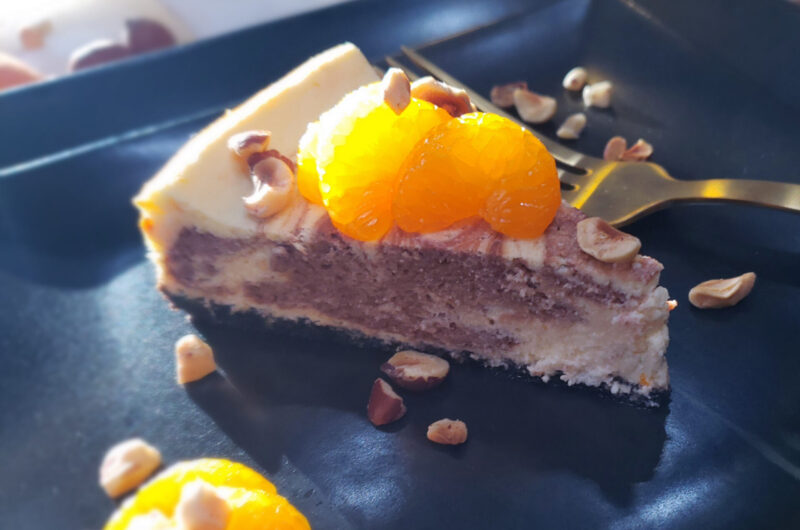
This deliciously Decadent 2 Layer Orange Nutella Cheesecake features swirled layers of vanilla orange cream and chocolate hazelnut cheesecake batter with a dark chocolate crust. Fresh orange slices lend a pop of clean, tartness that help balance this rich dessert. If chocolate, orange and cheesecake are among your list of favorites, this dessert is especially for you.
Even if you don’t have a springform cheesecake pan, you can still make this dessert. To learn the secret to making this chocolate swirl cheesecake recipe without a special pan, read on.
Jump to RecipeWhat kind of cheesecake is this Decadent 2 Layer Orange Nutella Cheesecake?
How would I describe this Decadent 2 Layer Orange Nutella Cheesecake? To fully answer that question, I first need to highlight the key characteristics of the three primary variations of cheesecake. This cheesecake has characteristics of two of the primary three: the New York Style Cheesecake and the Traditional Cheesecake.

New York Style Cheesecakes are known for being tall, rich, and dense with a creamy consistency. Their foundation consists of cream cheese and sour cream which gives them their firm texture, and they almost always sport a graham cracker crust. If you ask a purist how a slice should be served, they’ll likely say a slice of New York style cheesecake is best served plain or with a fruit sauce on top.
Traditional Cheesecakes are lighter, fluffier, a little sweeter and not nearly as tall. A hot water bath is often used to keep them from cracking. In addition, you will often see the baking technique starting at a higher temperature before lowering the temperature of the oven to finish the bake.
And then you have your No-Bake Cheesecake variety. These cheesecakes skip the eggs and often rely on gelatin to help stabilize them. Because they lack the same structural components of baked cheesecakes, they are often much softer.
This Decadent 2-Layer Orange Nutella Cheesecake recipe is a blend of the first two varieties. It’s rich and firm like a New York style cheesecake, and is so good it can be served without anything else on top. As far as swirl cheesecake recipes go, this cheesecake has chops.
However, like a traditional cheesecake, this recipe uses cream and eggs to give it a lighter, creamier and more delicate texture than its New York cousin. It will rise like a souffle during the bake, and reduce in height as it cools. In keeping with the water bath method of a traditional cheesecake, the addition of steam during the baking process is what keeps this delicate batter from cracking.
When the cake is ready, it will be dry on top to the touch, but still quite wobbly in the center. Don’t be tempted to over bake this cake. Over baking will result in cracks on the top of the cake. Trust the process and the bake time.The center will continue to cook and firm up as the cheesecake cools, resulting in a perfectly baked cake from edge to center.
No springform pan? No problem. Read on to learn how to make cheesecake without a special pan.
I have a springform cheesecake pan, but I rarely use it. It’s just as easy for me to use a regular cake pan to make cheesecakes as it is for me to use a special, springform pan. Any time I get a craving for a cheesecake but I don’t want to eat the whole thing, I’ll often split this recipe in half between two 6-inch cake pans. The cheesecakes will be more shallow, but will be just as delicious in their petite, highly-shareable form.
I also like dividing this lovely swirled chocolate cheesecake recipe into two smaller pans because you can easily freeze the second cake for a future date. A finished cheesecake will keep in the freezer for up to two months when placed in an airtight container and double wrapped in foil for added protection.
As for the “no springform pan needed” trick, I first introduced this technique in my recipe post for Deliciously Easy No Springform Needed Cheesecake. This vanilla cheesecake recipe is my go-to base for cheesecakes, and it’s also the foundation for this Decadent 2 Layer Orange Nutella Cheesecake recipe.
In addition to its rich, creamy texture, I love how adaptable this recipe is to alternative flavors and crusts. A simple vanilla flavored cheesecake can easily be transformed into a chocolate cheesecake recipe, a Nutella cheesecake recipe, or as in this case, a swirl cheesecake recipe.
Mmmm….swirls of orange cream cheesecake batter and Nutella cheesecake batter suspended together in a dark chocolate crumb crust. But I digress….
Below in the directions section of this recipe, steps 13 – 19 detail how to loosen and remove the cheesecake from the pan, but a summary is provided here as well. You can also check out my short video to help you visualize exactly how this technique works. Once you know the trick, you may never use your springform pan again.
- Prepare the pan by lining the bottom with an 8 inch circle of parchment paper. This will provide a non-stick lining between the crust and the pan.
- Before removing the cheesecake from the pan, it’s important to run a knife around the inside edge of the pan. This ensures the sides of the cheesecake are separated from the pan.
- Warm the bottom of the pan over a low-heat burner. The purpose of this step is to melt the fats just enough to loosen the crust from the bottom of the pan. You’re not getting it super hot. Just warm enough to break the seal.
- Finally, you’re using two plates to do “the flip” as I like to call it. The first inverts the cheesecake so it’s sitting upside down on a plate. The second flip rights the cheesecake on its crust.
Now that you know the trick, you can boast your mad cheesecake-making skills to the world by sharing with them this technique and perhaps a slice of this Decadent 2 Layer Orange Nutella Cheesecake.
Decadent 2 Layer Orange Nutella Cheesecake
Course: DessertCuisine: AmericanDifficulty: Intermediate10
servings20
minutes50
minutes8
hoursThis recipe can be prepared using either a 9-inch cheesecake spring form pan or two 6-inch pans. Bake time of the 9-inch pan will be approximately 50-55 minutes, while the smaller 6-inch cheesecakes will bake for 35 – 40 minutes. A 9-inch cheesecake will serve 10 people. A petite, 6-inch cheesecake will serve 4-6 people depending on the size of the slices.
Ingredients
- For the sugar wafer crust
20 Chocolate Wafer Cookies or the tops and bottoms of 18 Oreo cookies
2 Tbsp. unsalted butter
2 Tbsp. granulated sugar
- For the cheesecake batter
16 ounces regular cream cheese, room temperature
3/4 cup granulated sugar
1/8 tsp. kosher salt
1 1/2 tsp. orange zest
1 tsp. vanilla
4 large eggs
1/3 cup heavy whipping cream, brought to a simmer and cooled
1/2 cup Nutella chocolate hazelnut spread
- For baking the cheesecake
Either a 9-inch cheesecake spring form pan or two 6-inch pans.
1 cup hot water for steaming
Directions
- Preheat the oven and prepare the baking pan
- Place a lipped baking pan in the center of the oven and preheat to 350 degrees F.
- Depending on which size pan you are using, line the bottom of either the 9-inch cheesecake spring form pan or two 6-inch pans with a parchment paper circle cut to fit the bottom of the pan. Set aside.
- Prepare the crust
- Combine the chocolate cookie wafers, butter and sugar in a large capacity food processor, pulse approximately 25 times or until the cookies are crushed and the crust resembles the consistency of wet sand.
- Pour the crust into the cake pan and press flat with the back of a measuring cup. Make sure the crust is evenly distributed. Set aside.
- Prepare the batter
- Using the paddle attachment of a stand mixer, over medium speed, combine the cream cheese, sugar, salt and vanilla. Cream together until smooth and completely incorporated. Approximately 3 minutes. Scrape down the sides and bottom of the bowl.
- Add the eggs one at a time, followed by the orange zest. Mix over medium speed until completely incorporated. Scrape down the sides and bottom of the bowl between each additional egg.
- Add the cooled cream over medium-low speed and mix for another 2 -3 minutes. The batter should be smooth, without any clumps.
- Pour half of the batter into the prepared cake pan(s).
- Mix the Nutella into the remaining batter until it is smooth and evenly incorporated. Gently pour the Nutella cheesecake batter over the vanilla batter, making sure to distribute across the entire area of the pan. Using the tip of a knife, gently swirl the batters together, but be careful not to go too deep so as not to disturb the crust. Don’t overmix. You want to be able to see variations in the swirl.
- Place the cheesecake(s) in the center of the heated pan. Pour 1 cup of hot water on the heated pan to activate the steam.
- Bake the cheesecake at 350 degrees F. One 9-inch cheesecake will take approximately 50-55 minutes minutes, while two smaller 6-inch cheesecakes will bake for 35 – 40 minutes. The cheesecake will rise along the sides of the pan like a souffle and the top of the cheesecake should be smooth with just a hint of browning. You know the cheesecake is done when you can touch it in the center with your fingers and it is slightly bouncy to the touch. Do not over bake as this will cause the cheesecake to split in the center.
- Remove the cheesecake from the oven and gently run a knife between the edge of the pan and the cheesecake. Transfer the cheesecake to the refrigerator to cool uncovered overnight. The cheesecake will recede a little as it cools and that’s normal.
- Removing the cheesecake from the pan
- If you are using a spring form cheesecake pan, you can skip steps 13 – 17. But if you are using a regular cake pan to bake your cheesecakes, have two plates ready – one just for flipping and the one you wish to serve your cheesecake on.
- Gently run a paring knife along the inside rim of the cake pan to separate the cheesecake from the sides of the pan.
- Turn on a stove burner to the lowest setting. Holding the top sides of the cake pan, gently run the bottom of the pan over the warm burner for roughly 5 – 10 seconds. Be sure to heat the entire bottom surface of the pan. Give the cheesecake pan a good, vigorous shake.
- You should start to feel the cheesecake come loose from the pan. Once you do, invert the pan on to the first plate and lift the pan away from the cheesecake. You should now have the base of your cheesecake facing up. Remove the parchment paper.
- Place the second plate over the base of the cheesecake. Balancing both plates – one in each hand – invert the plates again. Your cheesecake should now be facing right side up on your presentation plate.
- Top with fresh orange slices or other fruit as desired.
- Cheesecake can keep for up to one week in the refrigerator.
Notes
- If you can’t find chocolate wafer cookies, you can use the tops and bottoms of 18 Oreo cookies, but remove the filling first.